Mold can have adverse effects on human health, especially when it is present in indoor environments where people live or work. Exposure to mold can cause a variety of health issues, depending on the type of mold, the extent of exposure, and an individual’s sensitivity or susceptibility to mold.
Cleaning moldy caulking in a shower requires careful attention and proper technique to ensure effective removal without damaging the caulk or surrounding surfaces. Every cleaning company face it every single day. Almost every shower has a little bit mold. Why? Because mold grow on moisture. Keep it mind. Mold needs a moisture to survive exactly as you need water and food. Without moisture there is no mold. Period. That is why shower with a door is the most effected areas. Moisture can stay there for hours. Caulking is the number one under attack as we all have own experience. Also every seller will tell you that longevity of caulking is about 2 years. Some claim 10 years but reality is about 2 years or less and it always depends on conditions. So at one point consider to replace old caulking for new one especially when mold is inside of the calking already. Trying to clean it is usually waist of time and money. Using bleach as we all use is not solver problem and cleaning companies have often hard time to explain it to customers.
Why not use a Bleach on silicone?
Bleach can be effective in removing mold on caulking in certain situations, but it is not always the best option and should be used with caution. Bleach is a strong disinfectant and can kill mold spores on contact, but it may not be effective at removing the mold stains from the caulking. Additionally, using bleach on certain types of caulking, such as silicone-based caulking, can damage the caulking material.
It’s important to note that bleach is not always the best solution for mold removal on caulking, especially if you have sensitive skin, respiratory issues, or if the caulking material is not compatible with bleach. In such cases, it’s best to use alternative mold removal methods or seek professional help.
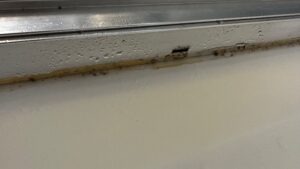
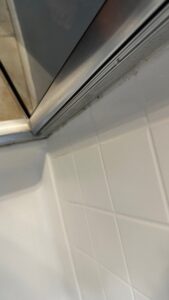
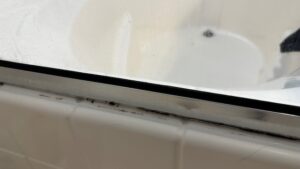
A Mold love caulking. Again it really depends on how long was not shower clean. So more often you clean and dry effected area better chances you have to prevent it from spreading.
Here are some steps to help you clean moldy caulking in your shower :
But again. Prevention is also key in mold control, so fixing any underlying moisture issues and keeping the area clean and dry can help prevent future mold growth.
-
Safety first: Put on protective gloves, goggles, and a mask to protect yourself from mold spores and cleaning chemicals.
-
Ventilate the area: Open windows and doors or turn on a ventilation fan to ensure proper airflow in the bathroom.
-
Remove loose mold: Use a stiff brush, such as a toothbrush or a small scrub brush, to remove any loose mold from the caulking. Dispose of the moldy debris safely in a sealed plastic bag.
-
Prepare a cleaning solution: Mix a solution of one part water and one part white vinegar or hydrogen peroxide in a spray bottle. Both vinegar and hydrogen peroxide have natural antimicrobial properties that can help kill mold.
-
Spray the solution: Spray the cleaning solution generously onto the moldy caulking. Make sure to saturate the moldy areas thoroughly.
-
Let it sit: Allow the cleaning solution to sit on the moldy caulking for at least 15-30 minutes to allow it to penetrate and kill the mold.
-
Scrub the caulking: Use a brush or scrub pad to scrub the moldy caulking vigorously. Pay special attention to areas with heavy mold growth. Use circular motions and apply enough pressure to effectively remove the mold.
-
Rinse and dry: Once the mold has been removed, rinse the caulking with clean water to remove any residue from the cleaning solution. Dry the caulking with a clean towel or cloth.
-
Prevent future mold growth: To prevent mold from coming back, keep your bathroom well-ventilated by using exhaust fans or opening windows after showering. Wipe down the shower walls and caulking regularly to prevent moisture buildup.
-
Consider re-caulking: If the mold growth has been extensive or the caulking is severely damaged, it may be necessary to remove and replace the caulking to ensure proper sealing and prevent further mold growth.
Note: If you are dealing with a large mold infestation or are unsure about how to safely clean mold, it’s recommended to consult a professional mold remediation specialist for proper assessment and remediation.
What to do if mold is inside of the calking and it doesn’t come out with any product?
If mold is embedded inside the caulking and doesn’t come out with any commercial mold removal products, or if the caulking is severely damaged, it may be necessary to consider re-caulking. Here are the steps you can follow:
-
Remove the old caulking: Use a utility knife or a caulk removal tool to carefully cut and scrape away the old caulking that is contaminated with mold. Be sure to remove all the affected caulking, including any moldy residue, and clean the area thoroughly with a mild detergent or a mold cleaner.
-
Dry the area: Ensure that the area is completely dry before proceeding with recaulking. You can use a towel or a fan to speed up the drying process.
-
Apply a mold-resistant caulk: Choose a high-quality mold-resistant caulk that is specifically formulated for use in bathrooms or other wet areas. Look for caulk that contains an antimicrobial agent, which helps to prevent mold growth. Follow the manufacturer’s instructions for application and use a caulk gun to apply a smooth and even bead of caulk along the joint or seam that needs to be sealed.
-
Smooth the caulk: Use a caulk smoothing tool or your finger dipped in water to smooth the caulk and create a neat and even finish. Wipe away any excess caulk with a damp cloth or sponge.
-
Allow the caulk to cure: Let the caulk cure for the recommended time as per the manufacturer’s instructions. Avoid getting the caulk wet during this curing period.
-
Maintain proper ventilation and cleanliness: After re-caulking, make sure to maintain proper ventilation in your bathroom to prevent excessive moisture buildup, which can contribute to mold growth. Regularly clean and inspect the caulked area to prevent mold from reappearing. If you notice any signs of mold growth in the future, promptly clean and address the issue to prevent it from spreading.
If you are unsure about re-caulking or dealing with mold in your bathroom, it’s recommended to seek professional help from a mold remediation specialist for proper assessment and safe removal of mold.